Summary sync setup process for QuickBooks Online
After installing our app, and approving the subscription charges you will get the option to select “Summary Entry to QuickBooks”. Please check the below screenshot.
_1681299239.png)
Once you have installed and connected our app with QuickBooks Online, then you will be required to save the settings on our app as per your requirement. These settings are very important and will be used by the app for summary sync.
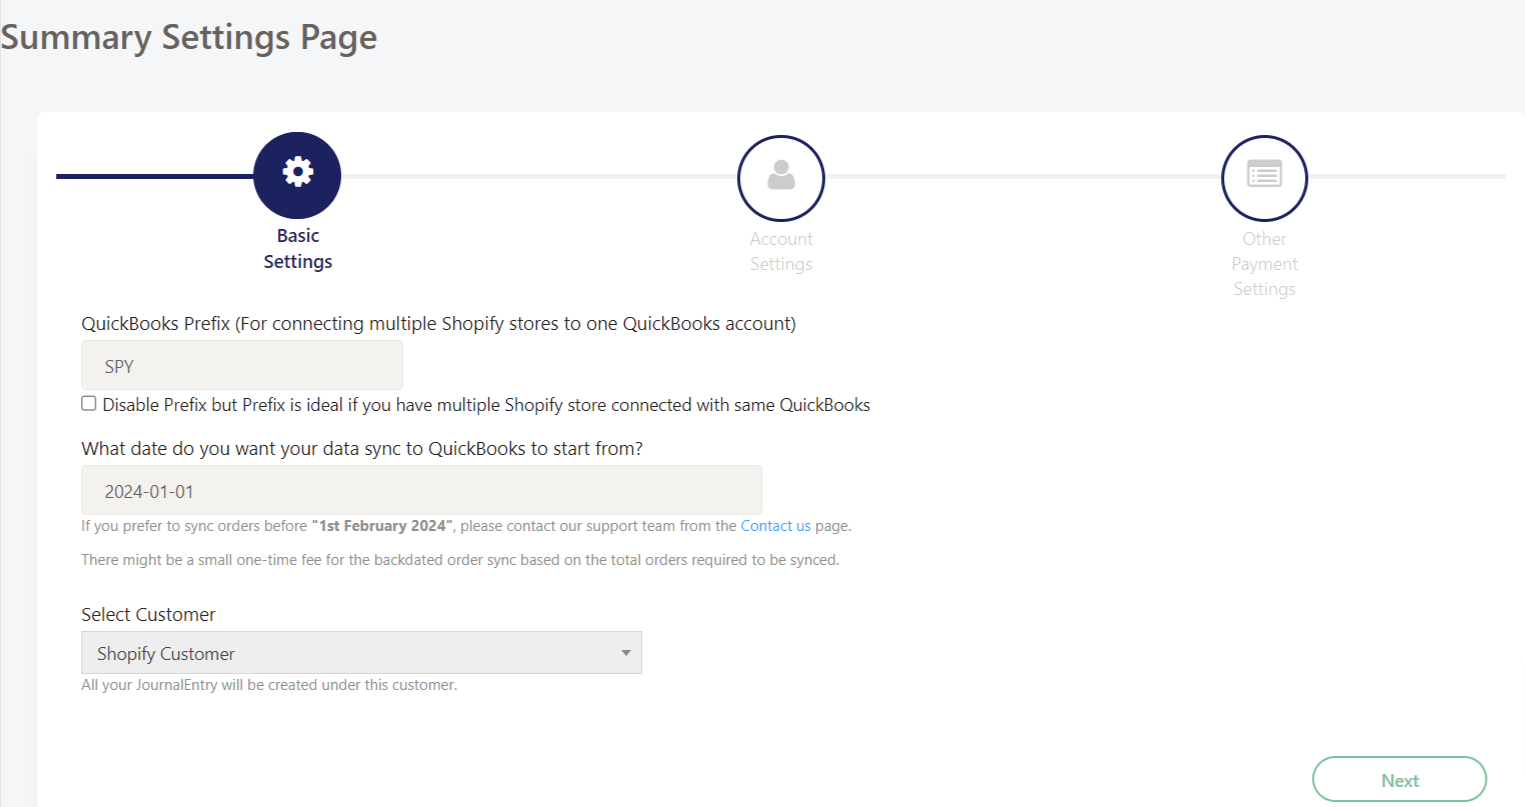
This is the first tab of our app settings.
1. QuickBooks Prefix - This is a prefix that will be put before the Summary invoice reference number. For example, if you select the ‘SPY’ prefix then the summary of let’s say “Paypal” orders from 01st January 2023 will be synced as SPY_Paypal_20230101. The summary of the Shopify payment method will be synced as invoice number "SPY_94497603807" where the number after SPY_ is the payout ID from Shopify. You also have the option to disable this prefix with the check box below but we suggest you use the prefix.
2. Date of Sync start - This is the date from when you want summary information to sync. Most often, it is either today, the beginning of the current month, or the beginning of the current financial year.
By default our app allows you to select the auto-sync start date back to the past 2 months. If you want to sync summaries beyond the allowed date then you can contact our team specifying the backdated orders timeline. There would be a nominal charge for the backdated order sync depending on the volume of orders.
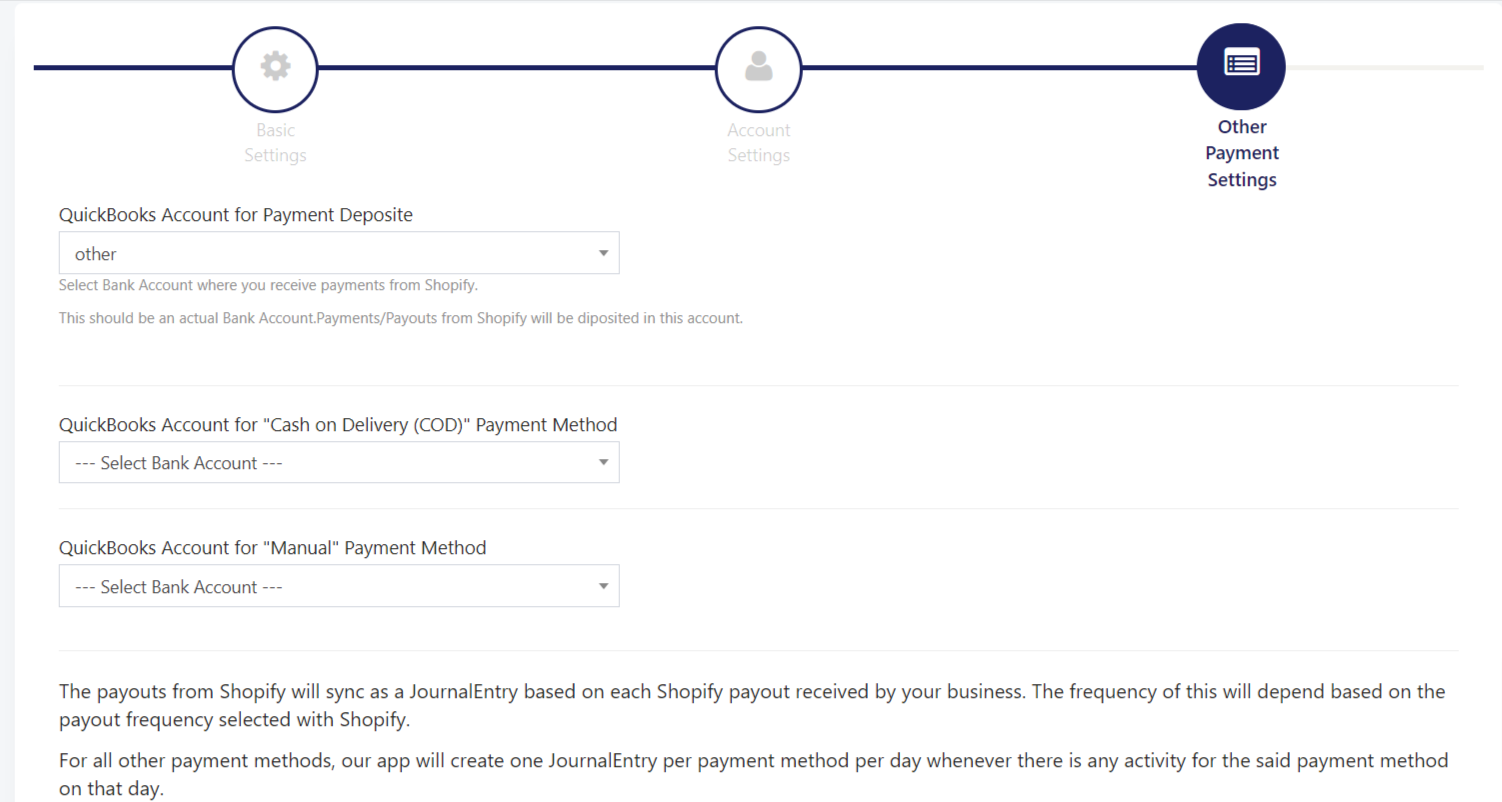
3. QuickBooks Account for Payment Deposit - In this option you will need to map a QuickBooks bank account in which you receive the payments for the orders processed on Shopify.
4. Select Customer - By default, all summaries will be created with the customer name "Shopify Customer" as this is the default customer selected in this field. If there is a need to sync the summaries with any other customer then you can select that customer name from the drop-down list. All summaries will be synced with the name of the customer selected here.
Tab 2 – Accounts Settings
On this tab, you will see the transaction types and default accounts selected by our app. The default accounts will be created in QuickBooks when you save the settings. If you want to sync the amount of any transaction type to any QuickBooks account other than the default account selected here then you can update the account from the drop-down list.
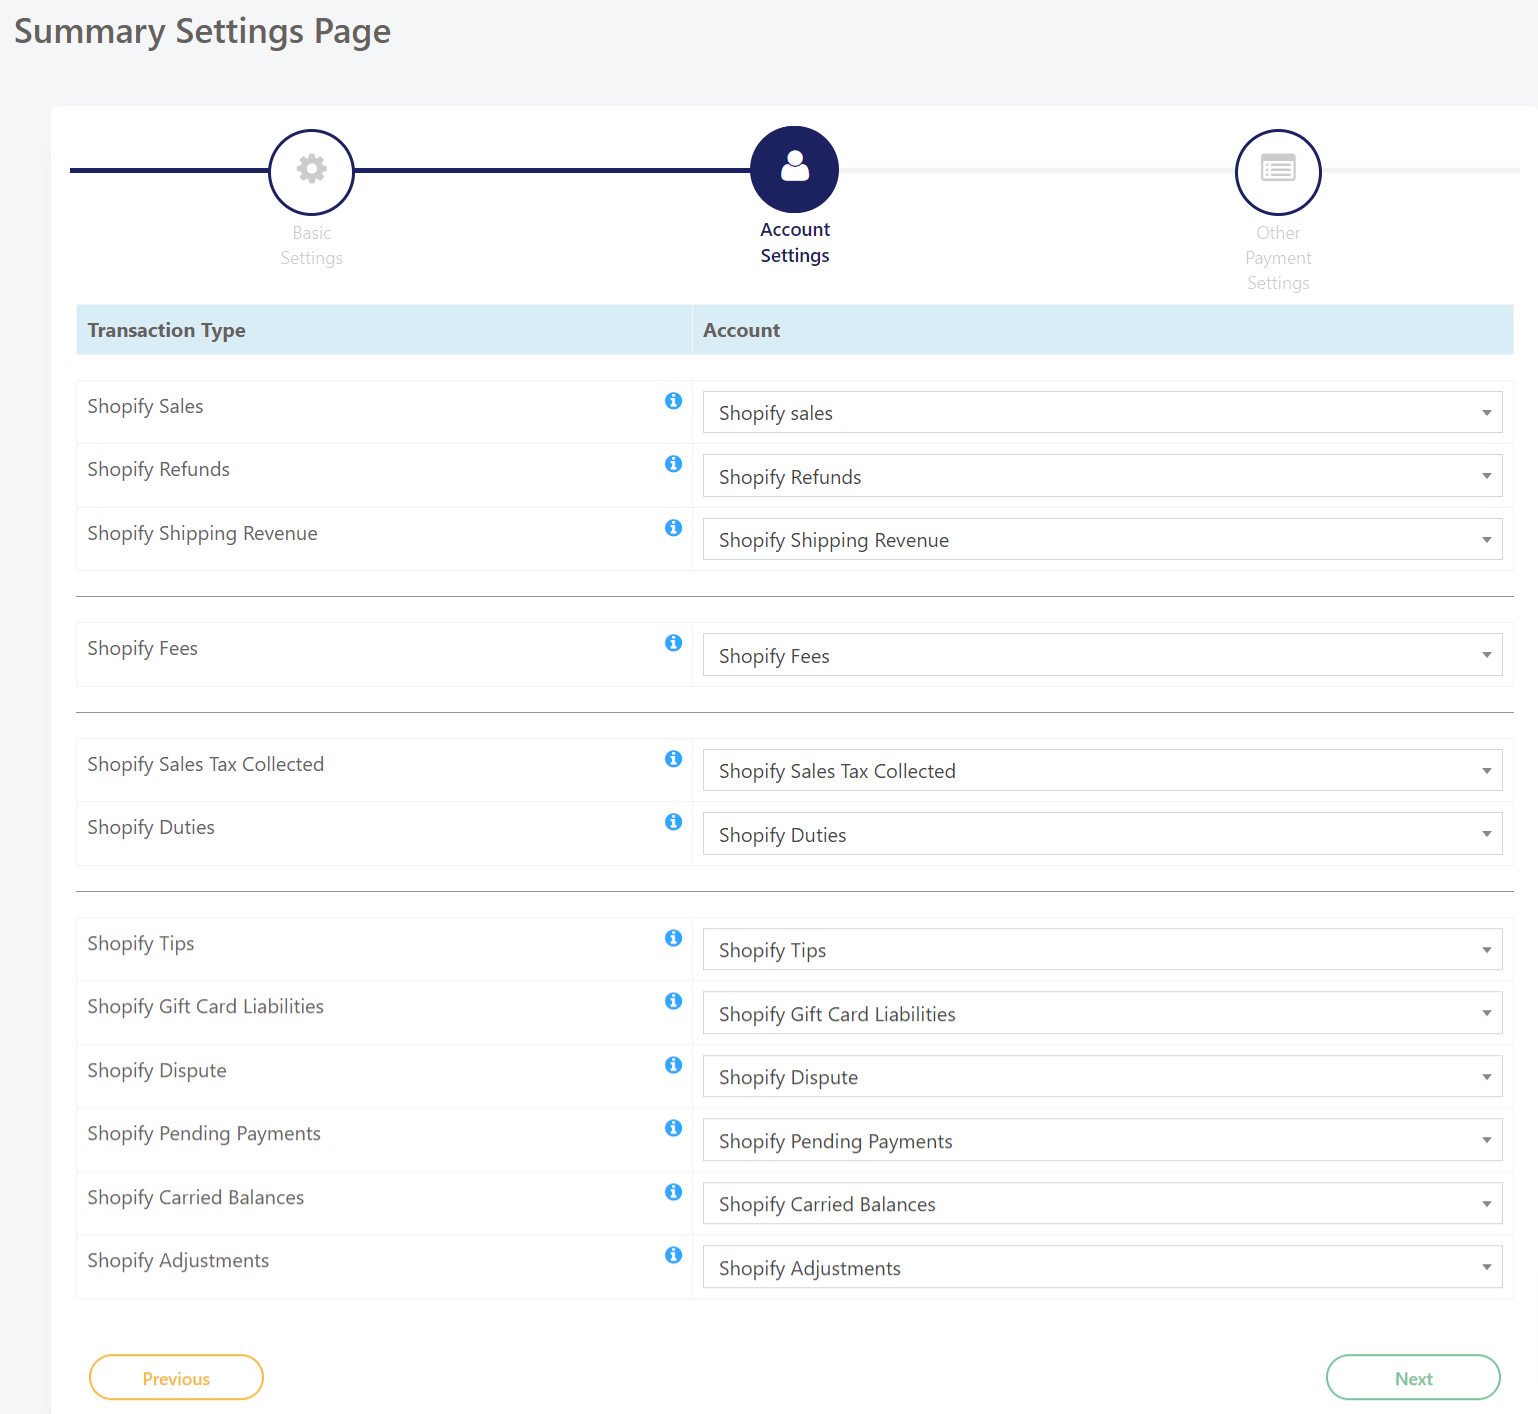
Below is a brief description of each of the Transaction types mentioned on 2nd tab.
1. Shopify Sales: All Shopify product sales will be recorded under the account selected here.
2. Shopify Refunds: The refunds created in Shopify will be recorded under the account selected here.
3. Shopify Shipping Revenue: The Shipping revenues will be synced to the account selected here.
4. Shopify Fees: Our app only receives the fee data for Shopify and PayPal payment methods. The fees will be synced to this account.
5. Shopify Sales Tax Collected: If you collect any Sales Tax or other similar tax from your customers, the tax will be synced to this account.
6. Shopify Tips: The tips received from the customers will be synced to the account selected here.
7. Shopify Gift Card Liabilities: In case you offer Gift cards to your customers, the liabilities for the gift cards or use of gift cards are accounted for in this account.
8. Shopify Dispute: Any charge dispute raised by customers and stopped by Shopify or released on winning the dispute will be synced to this account.
9. Shopify Pending Payments: Sometimes the payouts from Shopify might fail due to some banking or other error. The payment is retried in the next cycle until successful. The Pending payments will be synced to this account.
10. Shopify Carried Balances: If a particular payout is spread over multiple months, our app will split the sales/expenses into different months. Any amount that has to be carried forward to the other month will be accounted for in this account. This amount will usually be nullified immediately. If at all this is required, it will happen only for payouts using the Shopify Payments method.
11. Shopify Adjustments: If any mismatches or any other amounts are missing in the information and there is a need to make an adjustment to match the invoice with the payout amount, the adjustment will be done in this account so that it can alert you. If at all this is required, it will happen only for payouts using the Shopify Payments method.
Once you are satisfied with the accounts, please click on the Next button located at the bottom right corner on the 2nd tab and you will get the option to map the QuickBooks account to sync summary for other payment methods like Paypal, cash, etc.
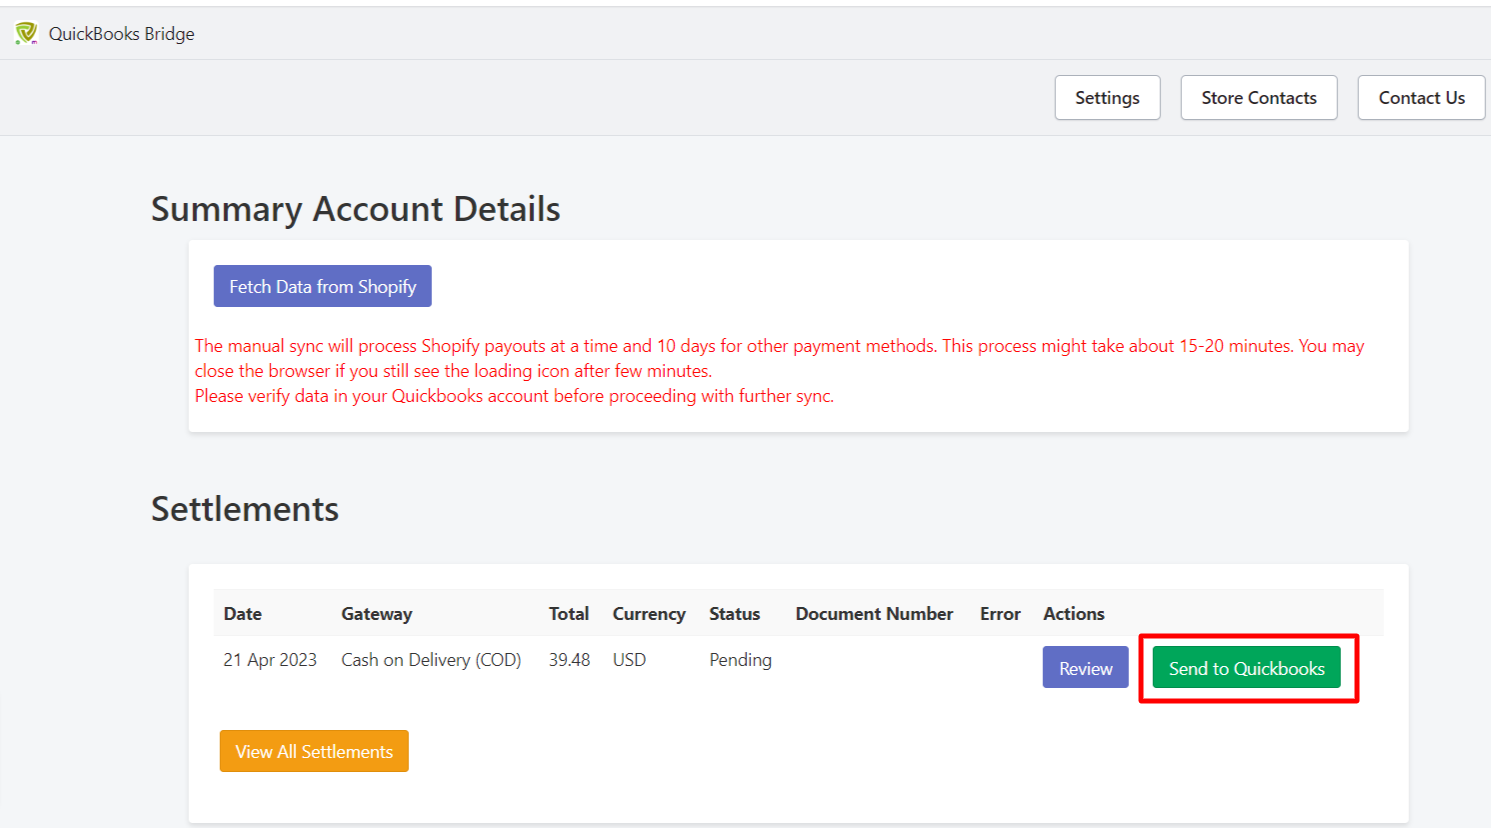
Once the settings are completed, click on the "Fetch Data from Shopify" button to initiate the data fetch process. Please note that it might take several minutes to finish this process for the first time. Once this process is completed, you will see a list of Invoices ready to be synced in the space under the red text in the below screenshot.
If you have any questions related to the settings on our app then please contact our support team via email by elaborating on the query related to our app setup and our team will assist you accordingly.