Setup Process for Individual Sync Type - Xero Bridge App
The core purpose of this app is to sync your orders from Shopify to Xero as Invoices. While doing this, there are also other elements that need to be synced along with the orders, such as Products, Customers, Shipping lines, taxes, etc. The app does this mostly in automated mode. However, to enable the app to do this smoothly, there is a need to setup the app correctly as per your requirements. This article will guide you through the setup process as well as explain the key functionality of the app.
Tab 1 – Order Settings
This is the very first step in Settings.
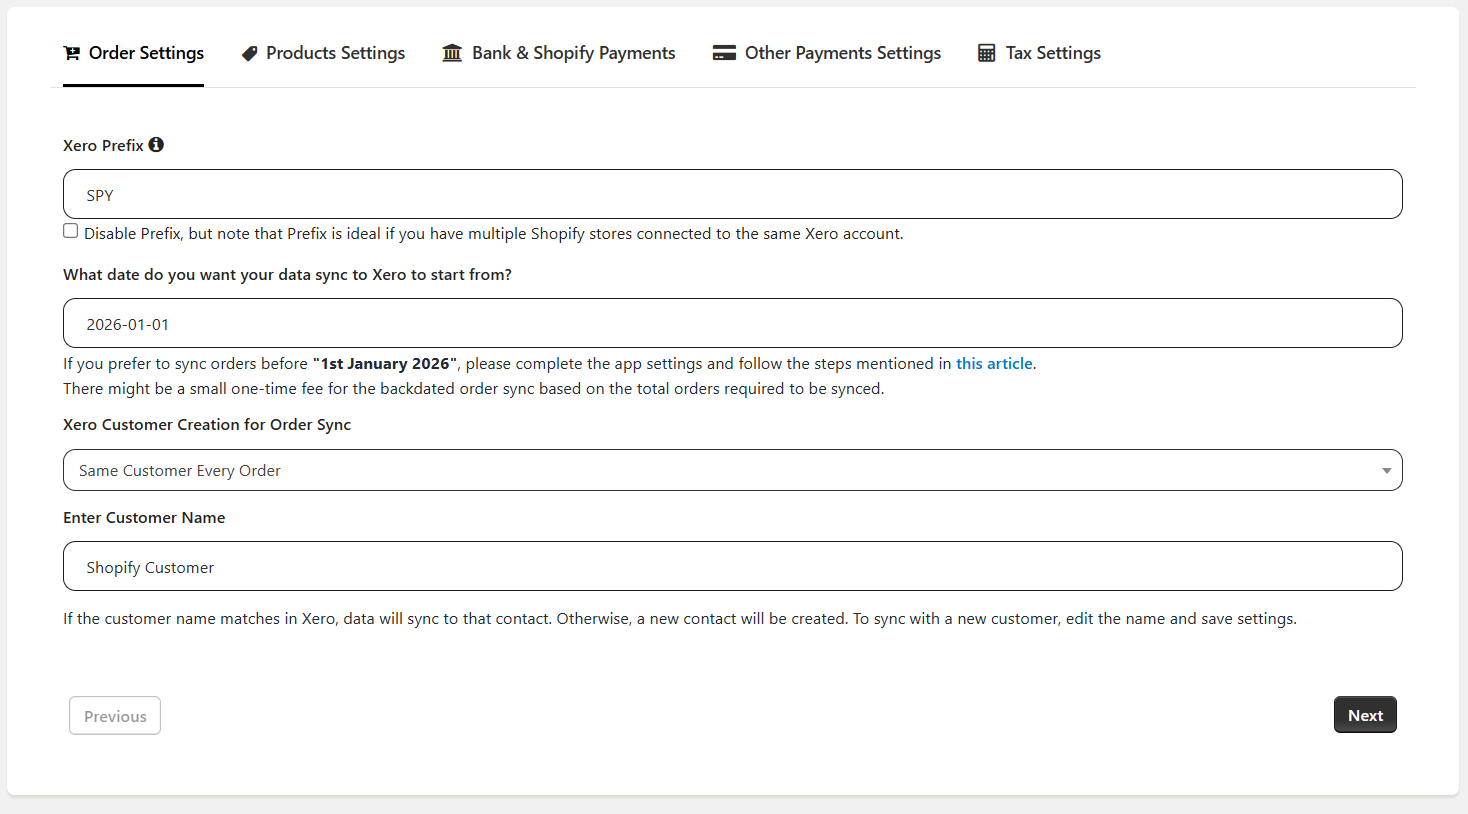
1. Xero Prefix
This is a prefix that will be put before the Invoice Reference number sent from Shopify to Xero. This is done primarily to differentiate the sales from Shopify and other sources – such as in-person, Amazon, etc. You also have an option to disable this prefix with the check box below but we suggest you use the prefix.
2. Date of Sync start
This is the date of order in Shopify from when you want your orders to sync. Most often, it is either today, the beginning of the current month, or the beginning of the current financial year. For higher volume stores, please select the date for the current month. If you want to sync orders beyond the allowed date, please contact our support team at xospsupport@parextech.com or from the Contact Us page in the app. There might be additional onetime charges for backdated orders beyond a certain period or above a certain volume.
3. Xero Customer Creation for Order Sync
In our app settings, for customer creation, there are two options.
Option 1 - Same Customer Every Order
Few stores only need to know their total sales in Xero from an accounting perspective, irrespective of who placed the order. Those customers select “Same Customer Every Order”. With this option, you can enter a customer name that is available in your Xero account. If the name matches against Xero’s Contact name field, that contact will be used to sync the orders in Xero. Otherwise, a new customer will be created.
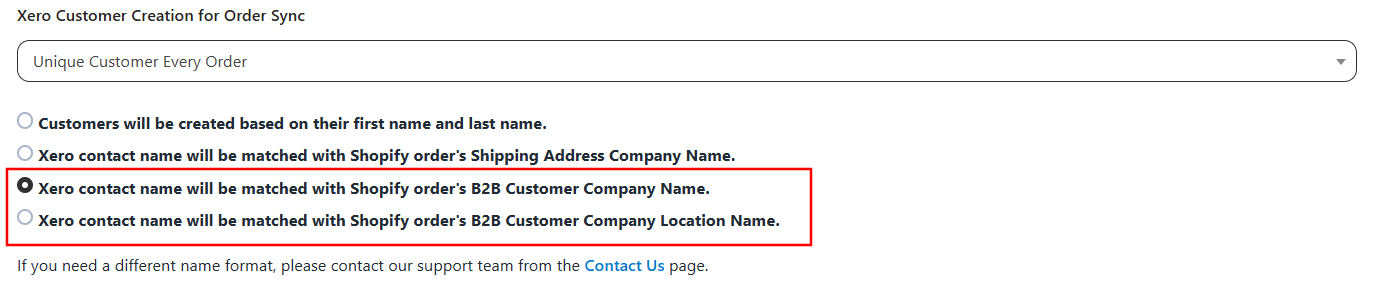
Option 2 - Unique Customer Every Order

Most stores prefer to use the actual customer details for an Invoice. They use the option “Unique Customer Every Order”. There are 2 options available. The first option will use the first name and last name from Shopify and match with the display name field in Xero. If the match is found, the contact will be mapped or a new contact will be created. The second option will match the company name from the shipping address of Shopify to the display name field in Xero. If the match is found, the contact will be mapped or a new contact will be created.
If your Shopify store is on the Shopify Plus plan, you will have two additional options to sync the B2B Customer Company Name or the B2B Customer Company Location Name, as shown in the image below.
If you need to use any other customer information other than first name and last name then you have to contact our support team at xospsupport@parextech.com or from the Contact Us page in the app
Tab 2 – Product Settings
This is the page for Product Settings
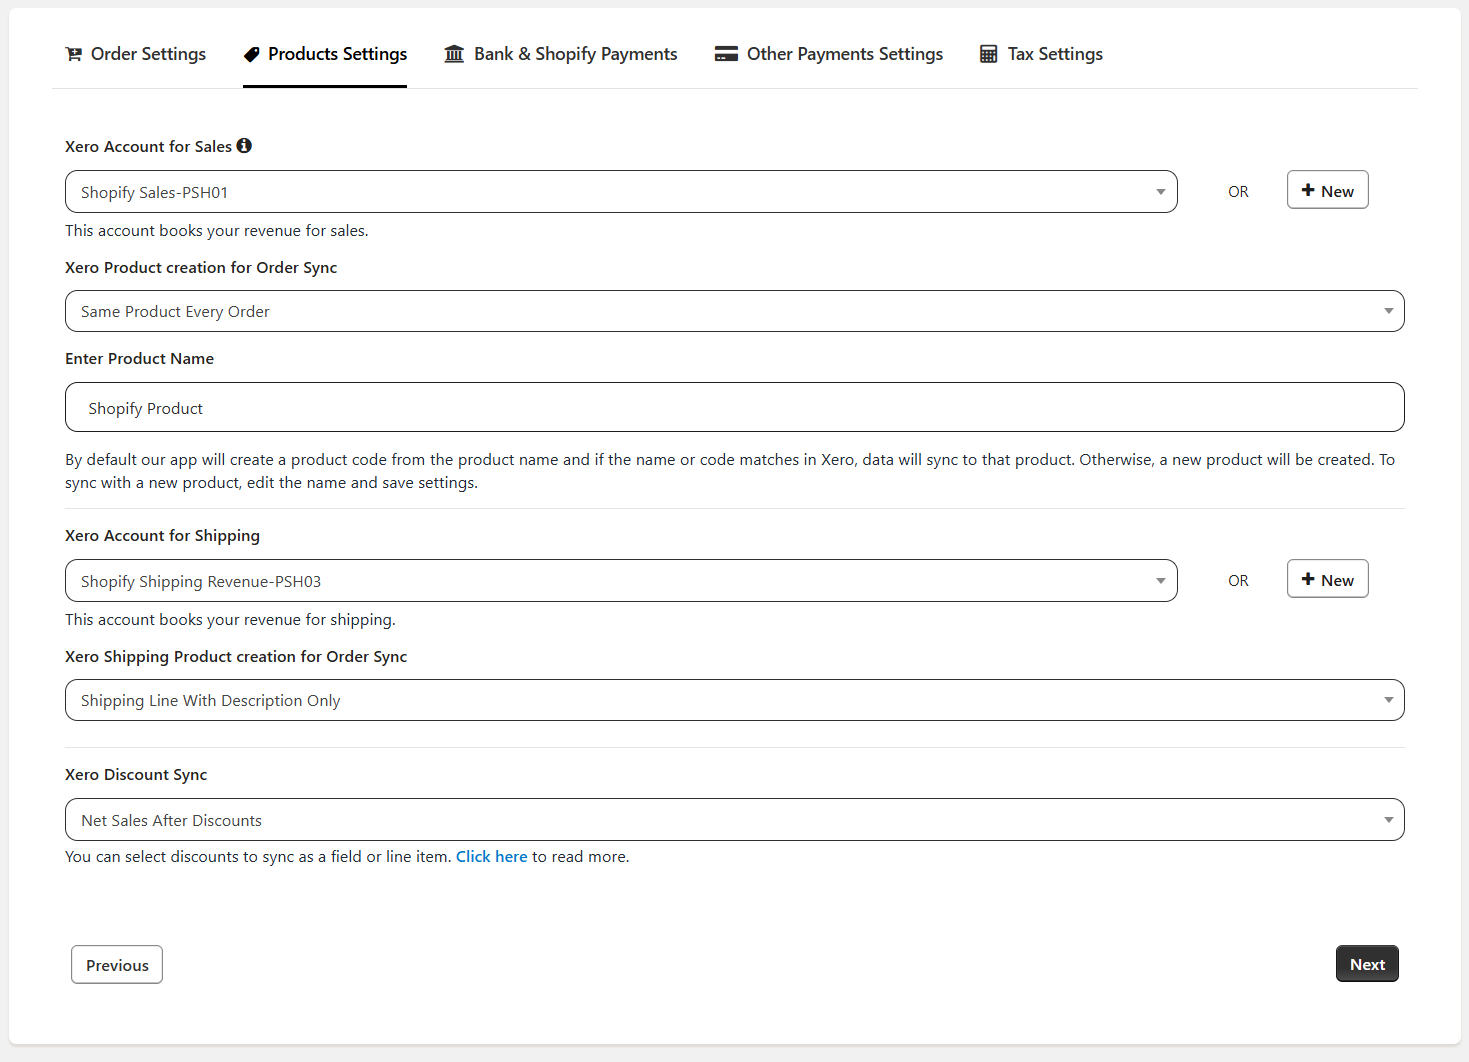
1. Xero Account for Sales
This is the account in your Xero where you want to book your sales from the Shopify Store. You would already have a few accounts but if you want to use a new Account, you can create one from the “Add New” button next to this field. This is the account under which the new products will be created. If a product already exists in Xero, sales for that product will show under the relevant account of Xero.
If you have a specific requirement then we have a feature to sync the orders to separate accounts based on different parameters of an order. For more details, please contact our support team at xospsupport@parextech.com or from the Contact Us page in the app.
2. Xero Product Creation for Order Sync
In our app settings, for product creation, there are two options.
Option 1 - Same Product Every Order
Few stores only need to know their total sales in Xero from an accounting perspective irrespective of what product is sold. Those stores select “Same Product Every Order”. With this option, you can enter a product name that is available in your Xero account. If the name or product code matches in the Xero, that product will be used to sync the orders in Xero. Otherwise, a new product will be created.
Option 2 - Unique Product Every Order
Most stores prefer to use the correct product for every order. For them, keep the drop-down value as “Unique Product Every Order”. With this setting, the invoice created in Xero will have the actual product details in the line items.
We have 2 options in our app for product matching - SKU & Name.
If you select the SKU matching, our app matches the SKU from Shopify with the SKU in Xero.
With name matching, our app matches the product name (product title - Variant title) from Shopify with the Product Name in Xero.
In both the above cases, when a match is found, our app will map the product. If a match is not found, our app will create a new product in Xero.
3. Xero Account for Shipping
This is your shipping account. This is the account where you want to record the shipping revenue of your customers. You can add a new one from the “Add New” button if you are new to Xero and do not have a shipping account created in Xero.
4. Xero Shipping Product creation for Order Sync
In our app settings, for shipping products, there are two options.
Option 1 - Shipping Line With Description Only
Most stores prefer to use the correct shipping product for every order. For them, keep the drop-down value as "Shipping Line With Description Only". With this setting, the invoice created in Xero will have the actual shipping product details in the line items.
Option 2 - Shipping Line With Description and Product
With this option, you can use a single shipping product available in your account, and while syncing orders, our app will sync the same shipping product for each order in Xero.
Some stores, only need to know that shipping is utilized in sales irrespective of what shipping product is. Those stores select "Shipping Line With Description and Product".
5. Xero Discount Sync
By default, our app enters the sales amount for each line item in the invoices as an amount net of the discount amount. If you want to sync the discount then you can select to sync the Discount as a Line Item or Discount as a Field from the drop-down.
Tab 3 – Bank & Shopify Payments Settings
This is the page for Order Payment Settings. It is one of the most important parts of the app setup.
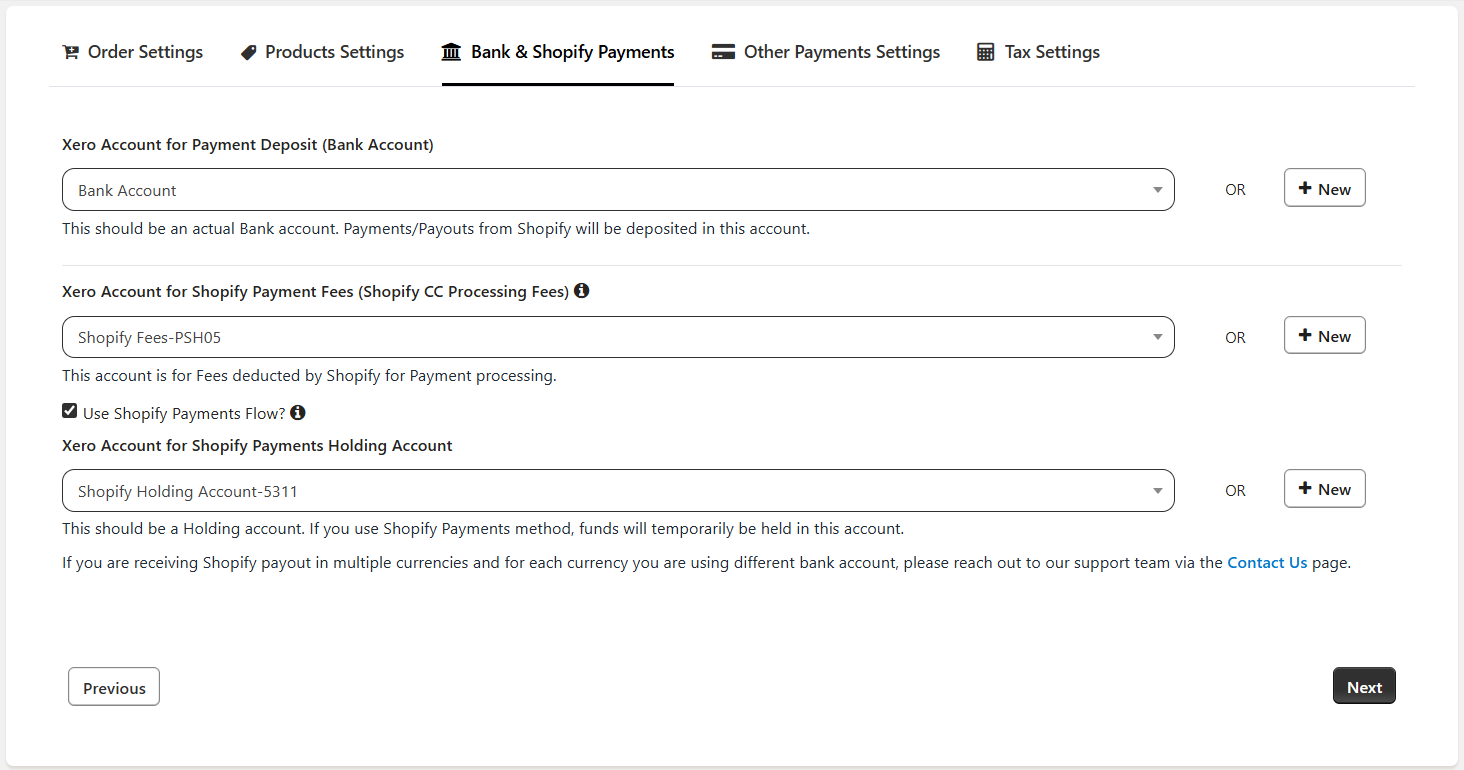
1. Xero Account for Payment Deposit
This is your bank account. This is when you receive the funds either from Shopify or directly from your customers.
2. Xero Account for Payment Fees
Shopify also deducts some fees for the transactions they process. This field is for recording those fees. Shopify deducts these fees from the amount it has collected from the customers. Only accounts that can accept Payments can be chosen here.
Please refer to the Shopify Payments Flow details below before you continue to the next set of fields
3. Use Shopify Payments Flow – Checkbox
To use the Shopify payments flow, please keep this checkbox enabled. If this field is disabled, the payment for all the orders placed using Shopify Payments will be entered directly into the bank account.
4. Xero Account for Payment using Shopify Payments
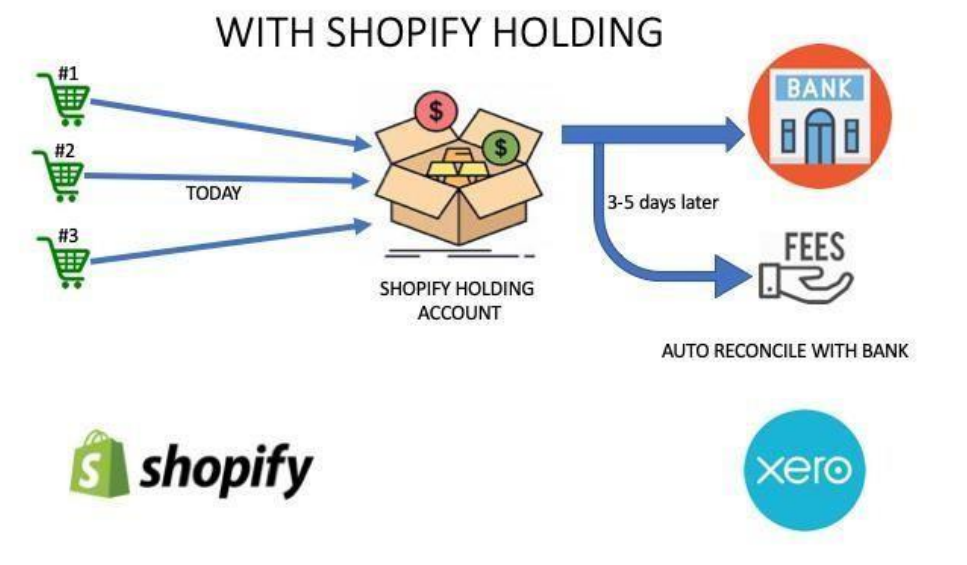
Until the time you actually get the funds in your bank accounts, it is advisable to record the transactions against a dummy Bank account in Xero. The ideal name for this Account will be “Shopify Holding Account”. If you do not already have such an account, please create one from the “Add New” button. When a customer makes a payment using the Shopify Payments method (Credit Card), the payment will be credited to this account. We suggest you select the current asset type of account for holding account because the Shopify Holding account is a dummy account and does not have an ‘underlying bank statement’.
If this mode is used, there will be a transaction entry and an Expense entry created by our app which will effectively transfer the funds from the Shopify Holding account to the actual bank account as well as the fees. This will be very helpful in your Bank reconciliation because the amount in the bank statement will match exactly the amount transferred by the app to your Bank account.
Other Payment Methods Please use the next tab of the settings page to configure the other payment methods.
Shopify Payments Flow
Most stores use the Shopify Payments method to collect the payments from the customers. You might be using PayPal, Cash On Delivery, and other methods as well.
If you use Shopify Payments as one of the payment methods, this is how the flow works.
1. When a customer places an order on your website/POS and makes a payment, Shopify collects the payment from the customer’s Credit card. This payment is held by Shopify for 2- 3 days based on the plan you have with them.
2. After a few days, Shopify deposits an amount to your bank account. This amount is a sum of payments of several orders placed a few days back based on the time and when the processing is done in Shopify. Shopify deposits the amount after deducting their share of the fees. This deposit/transfer is called a Payout.
Without Shopify Payments Flow
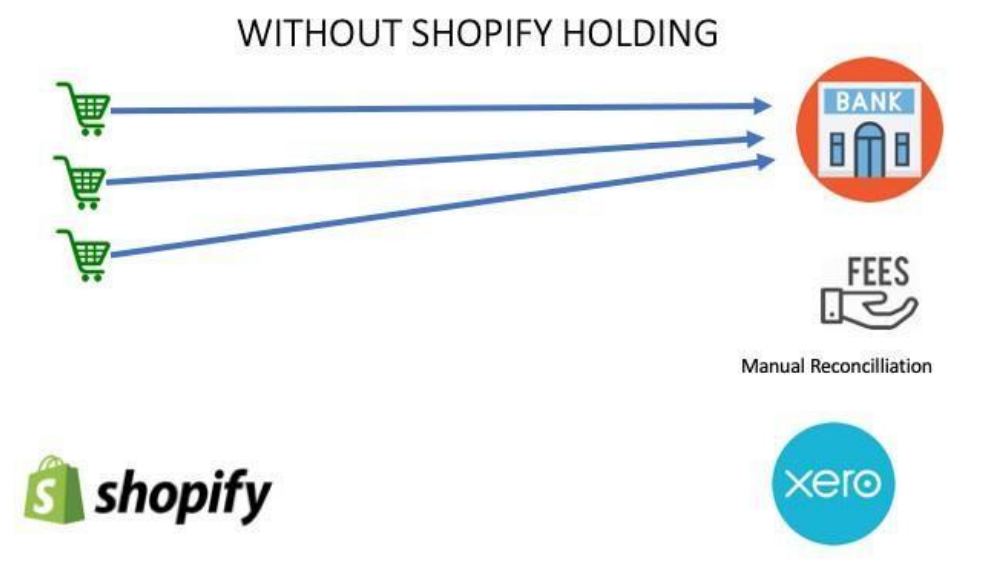
If you decide not to use the Shopify Payments flow, please uncheck the checkbox. Now, all payments received from the Shopify Payments method will be deposited in your Bank account selected on this tab.
In this case, you will have to manually reconcile the orders to your bank account.
Tab 4 – Other Payment Settings
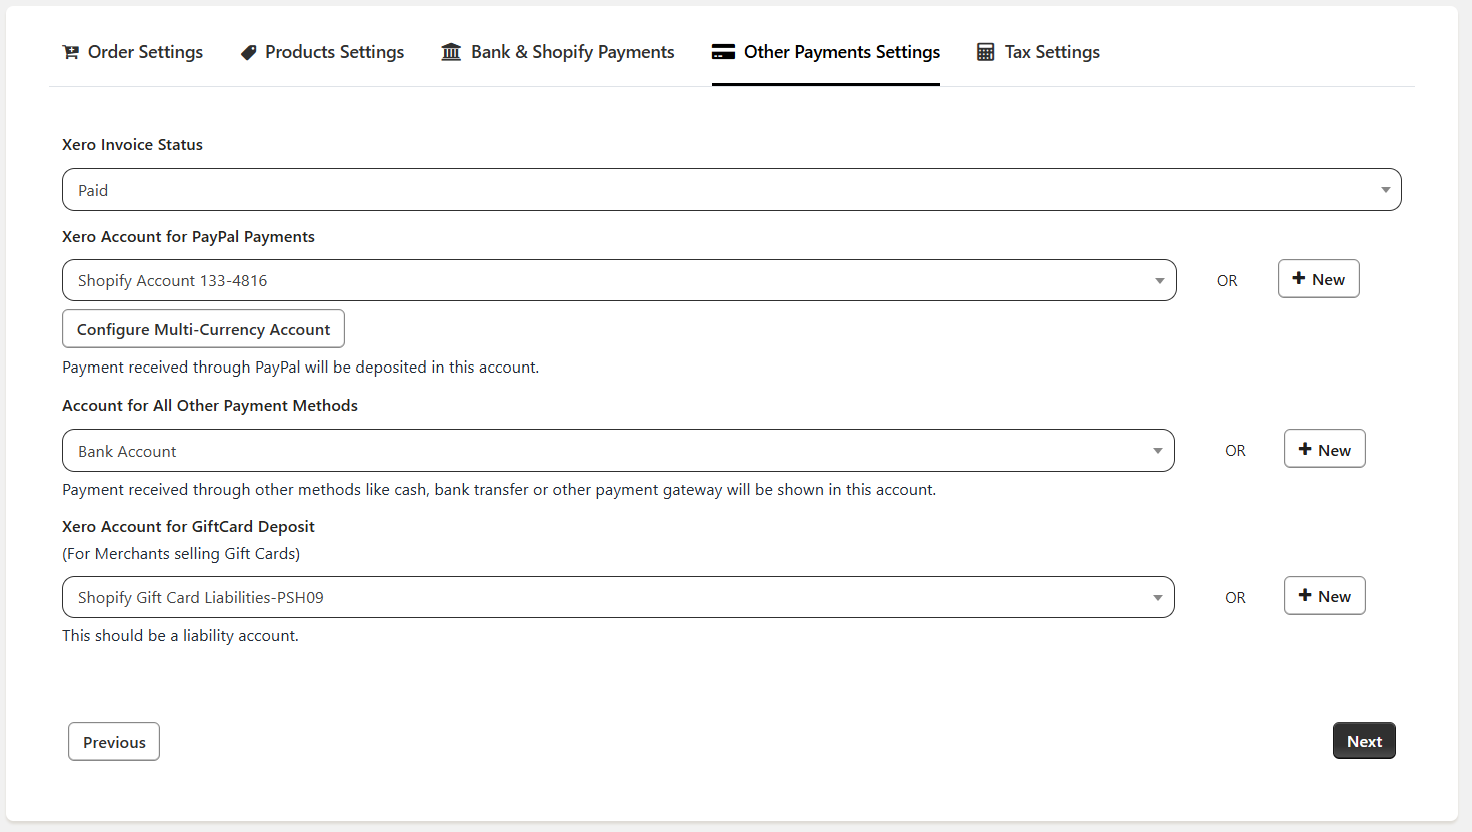
1. Xero Invoice Status
This setting is used to sync invoices with the following statuses in Xero: Paid, Draft, Awaiting Payment, and Awaiting Approval. If you select any value other than Paid, the Xero Account for PayPal Payments and Accounts for All Other Payment Methods dropdowns will be disabled, as payments will not be synced to other Xero account statuses.
2. Xero Account for PayPal Payment
This is the accounts receivable or Bank account where you receive the Payments for orders paid by PayPal. You can add a new one from the “Add New” button if you are new to Xero and do not have a PayPal account created in Xero.
If you connect your PayPal account as a bank feed, the payment made through this mode will auto-match to an entry in the PayPal account and will be very helpful in bank reconciliation.
In case you are receiving PayPal transactions in different currencies then you can select the account for those currencies by clicking on the ‘Configure Multi-Currency Account’.
3. Xero Account for PayPal Fee
PayPal deducts some fees for the transactions they process. This field is for recording those fees. PayPal deducts these fees from the amount it has collected from the customers. Only accounts that can accept Payments can be chosen here.
4. Xero Account for All Other Payment Methods
This is the account to track the payments from methods other than PayPal & Shopify Payments. This can either be Cash payment, bank transfer, or any other mode. If this field is left blank, the payments to Other Methods will directly go to the Bank account selected in the previous tab. i.e Xero Account for Payment Deposit (Bank Account)
5. Xero Account for Gift Card
This is an optional field only for stores that sell Gift cards as well. This is a Current Liability type of account.
All Gift card sales are considered a liability until a purchase is made using that Gift card. If you select the Liability account, then any transactions that are paid through the Gift cards will decrease the Gift Card liability account and if the customer purchases a Gift card, then the Liability account increases.
6. Xero Account for All Other Payment Methods
This is the account to track the payments from methods other than PayPal & Shopify Payments. This can either be Cash payment, bank transfer, or any other mode. If this field is left blank, the payments to Other Methods will directly go to the Bank account selected in the previous tab. i.e. Xero Account for Payment Deposit (Bank Account)
7. Xero Account for Gift Card
This is an optional field only for stores that sell Gift cards as well. This is a Current Liability type of account.
All Gift card sales are considered a liability until a purchase is made using that Gift card. If you select the Liability account, then any transactions that are paid through the Gift cards will decrease the Gift Card liability account and if the customer purchases a Gift card, then the Liability account increases.
Tab 5 – Australia and New Zealand Tax Settings
For most stores, there are only two types of tax rates that are collected.
One is the normal tax rate for sales based on their jurisdiction. The other one is for exempt or zero-rated products where no tax is collected.
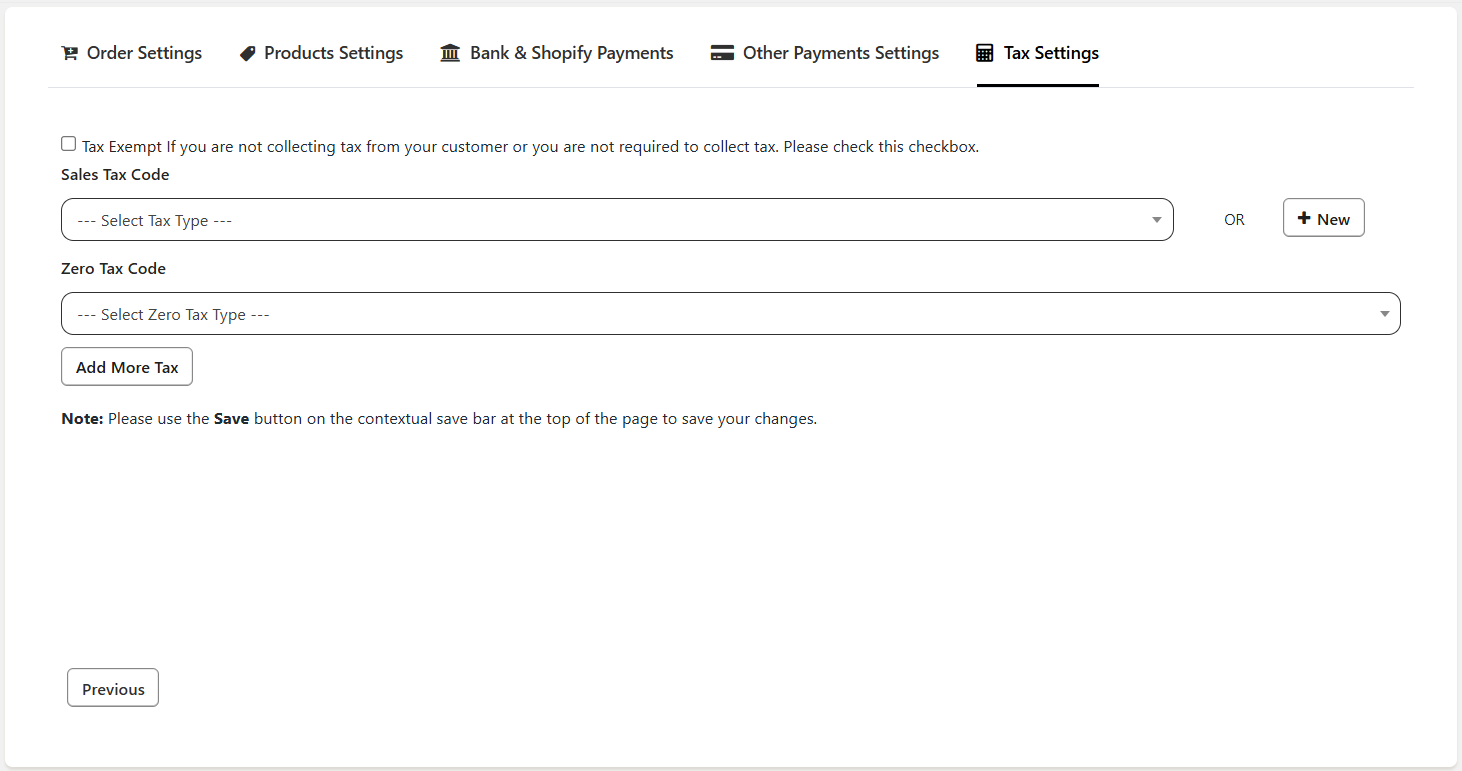
1. Xero Sales Tax Code
This is the tax code for normal products (non-zero rated). This will be based on the Country/Province/State that the business is registered in.
2. Xero Zero Tax Code
This is the tax code name for the products or orders that do not have any taxes applied to them. This field usually is a Zero-rated field or an Exempt field.
3. More Tax Codes
If there are more than 2 tax codes that are required to be configured for other Tax rates, please use the “Add More Tax” button to add the other rates. We will match the Tax rate charged by Shopify with these other rates. If we find a match, we will use the relevant tax code. If we do not find the right match, we will use the default tax code set in Point 1 above.
Tab 5 – United Kingdom Tax Settings
For stores based in United Kingdom
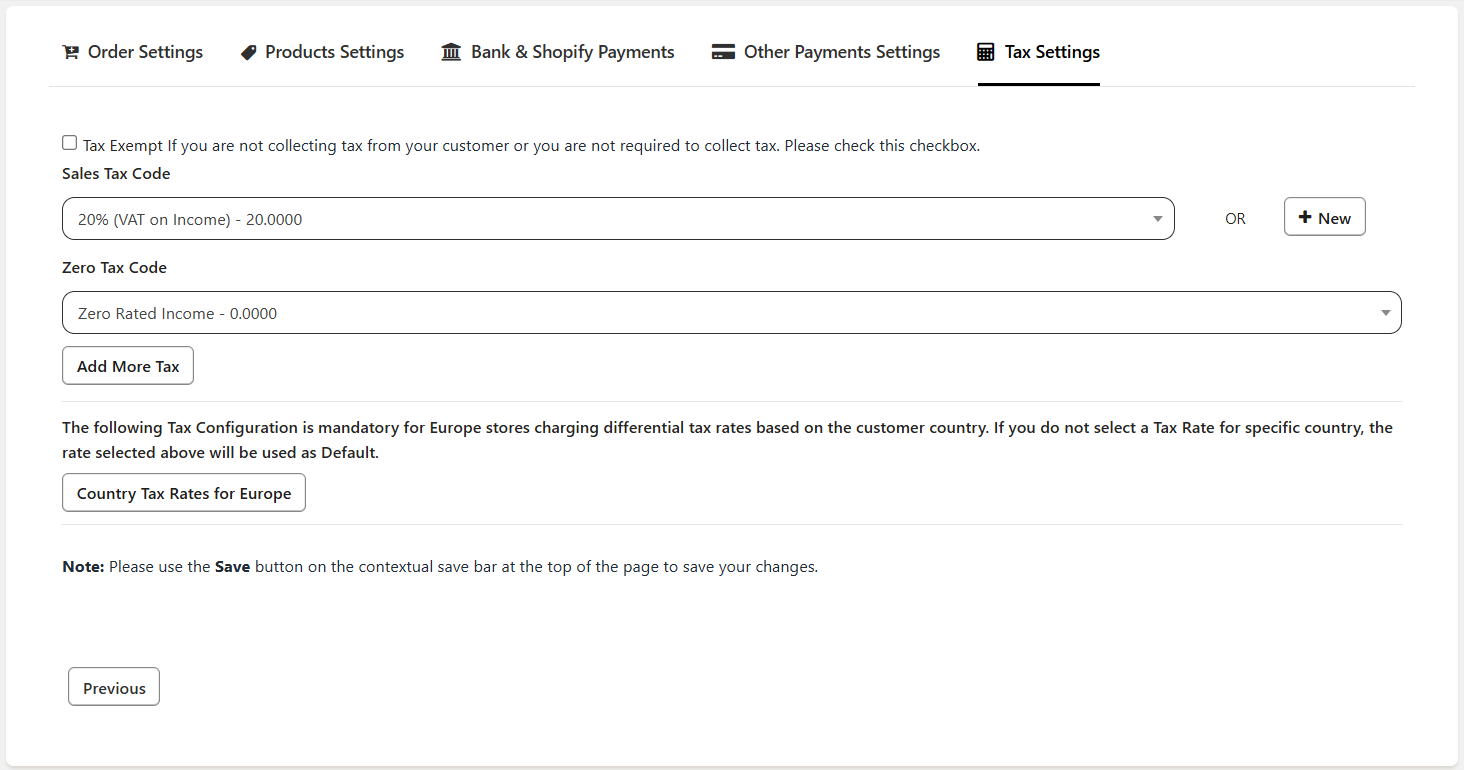
For most stores, there are only two types of tax rates that are collected. One is the normal tax rate for sales based on their jurisdiction. The other one is for exempt or zero-rated products where no tax is collected.
1. Xero Sales Tax Code
This is the tax code for normal products (non-zero rated). This will be based on the Country/Province/State that the business is registered in.
2. Xero Zero Tax Code
This is the tax code name for the products or orders that do not have any taxes applied to them. This field usually is a Zero-rated field or an Exempt field.
3. European Countries Taxes
To configure the tax rates for European countries, please use the "Country tax rates for Europe" button. If there is a tax applied to an order in Shopify, our app will select the correct tax code based on the settings that you have done in our app. If there is no tax applied on the order in Shopify, then our app will apply the relevant tax code for 0% tax in the invoice in Xero.
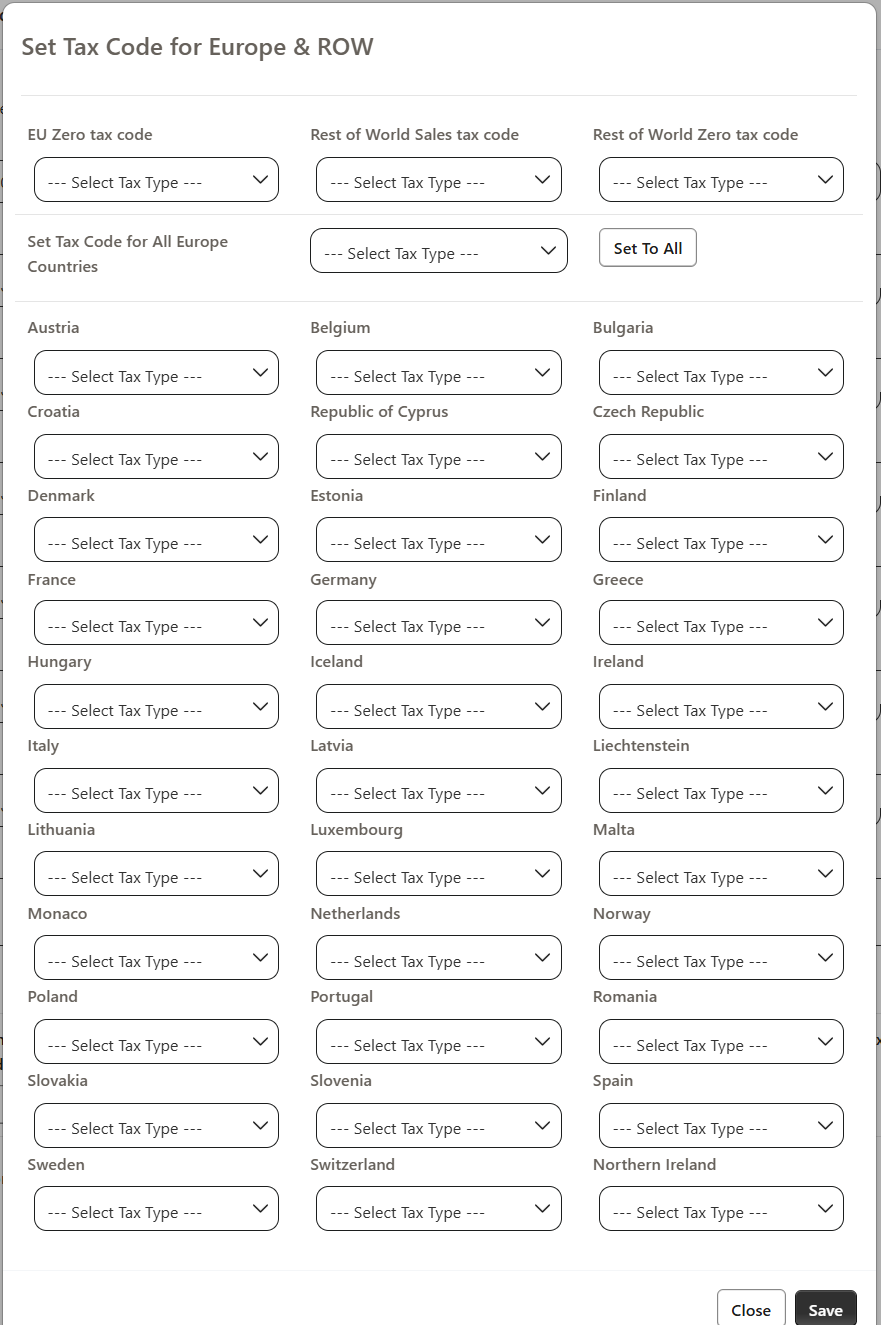
If the tax rates for European countries are left empty, the default rate in Point 1 will be applied to the orders in European countries.
Tab 5 – USA Tax Settings
For stores based in the United States
For most stores, there are only two types of tax rates that are collected. One is the normal tax rate for sales based on their jurisdiction. The other one is for exempt or zero-rated products where no tax is collected.
1. Xero Sales Tax Code
This is the tax code for normal products (non-zero rated). This will be based on the Country/Province/State that the business is registered in.
2. Xero Zero Tax Code
This is the tax code name for the products or orders that do not have any taxes applied to them. This field usually is a Zero-rated field or an Exempt field.
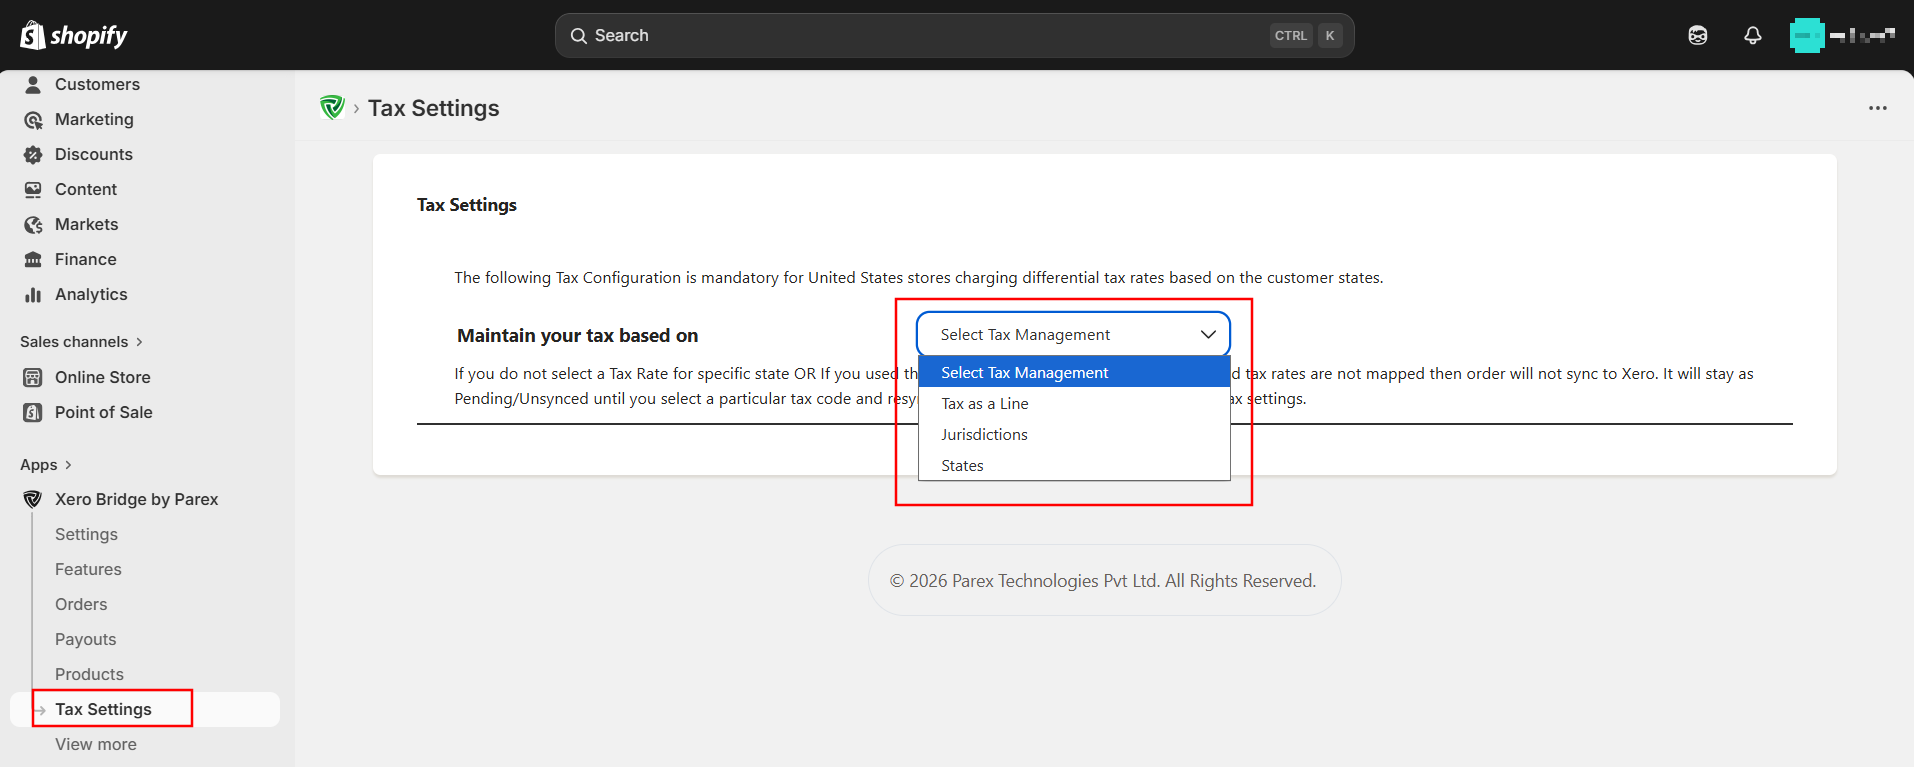
3. Configure USA tax
You can configure the tax rates as Tax as a Line or State wise or Jurisdiction wise.
To implement this, you can navigate to our app in Shopify and click on Settings >> Tax settings. If you are receiving the flat tax for the states then you can select the States from the drop-down list or you can select Jurisdiction if you are receiving the tax for the city, state, and county. Below is the screenshot to navigate to tax settings.
1. If you want to create a Tax as a Line then you can select that option in our app settings.
2. If you are receiving the flat tax for States then you can create the tax rates in Xero and then configure them in our app settings.
3. If you are receiving the tax Jurisdiction wise, then our app will auto detect it and display it in the tax setting after syncing the first order from that Jurisdiction. Later you can update our app settings by selecting the respective tax rate and tax code because there may be the same tax rates for many jurisdictions.
Tab 5 – Canada Tax Settings
For stores based in Canada
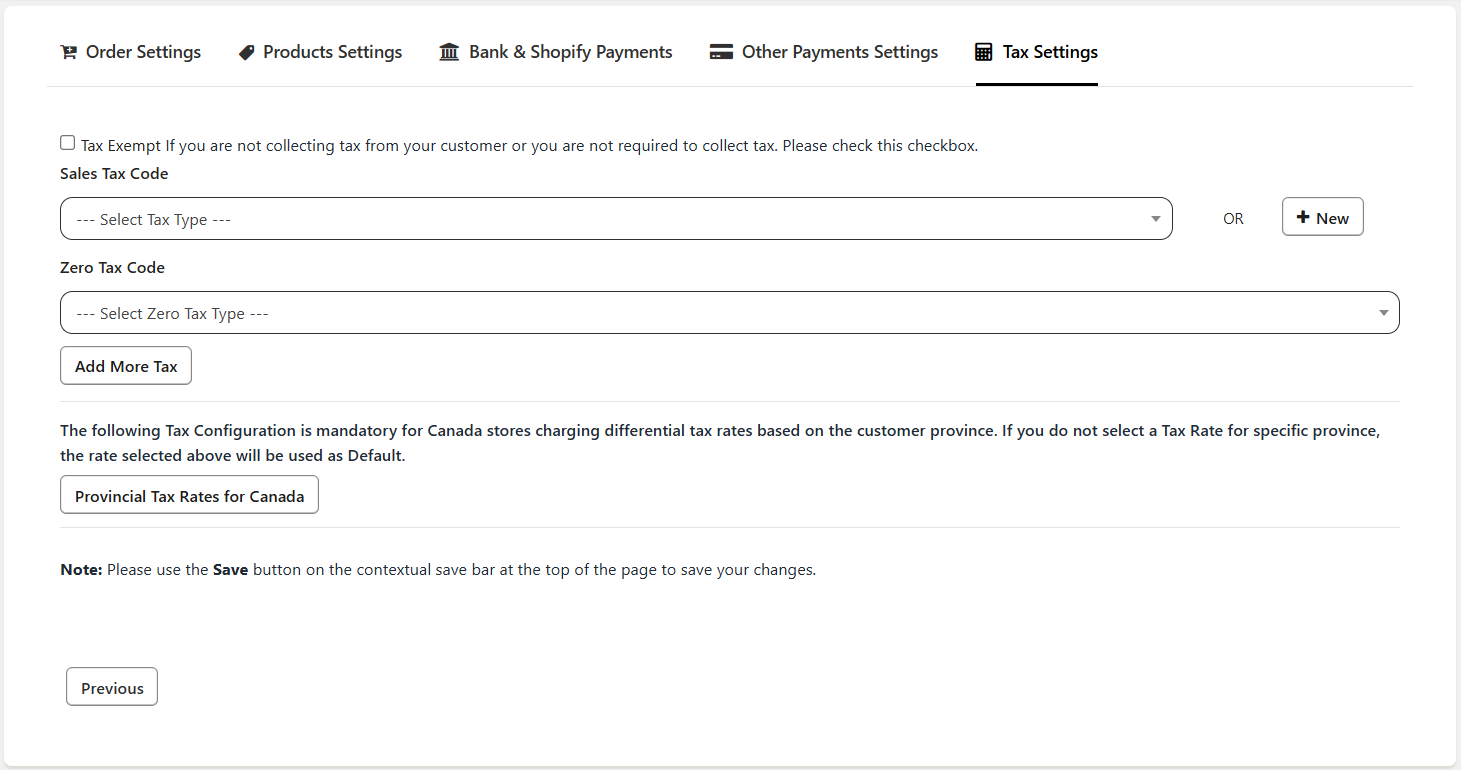
For most stores, there are only two types of tax rates that are collected. One is the normal tax rate for sales based on their jurisdiction. The other one is for exempt or zero-rated products where no tax is collected.
1. Xero Sales Tax Code
This is the tax code for normal products (non-zero rated). This will be based on the Country/Province/State that the business is registered in.
2. Xero Zero Tax Code
This is the tax code name for the products or orders that do not have any taxes applied to them. This field usually is a Zero-rated field or an Exempt field.
3. Canada Province Taxes
If your store is based in Canada and you charge taxes as per Canadian laws, most businesses are supposed to collect taxes for the province based on the delivery address of the order. You can set up the default rates with Points 1& 2 above.
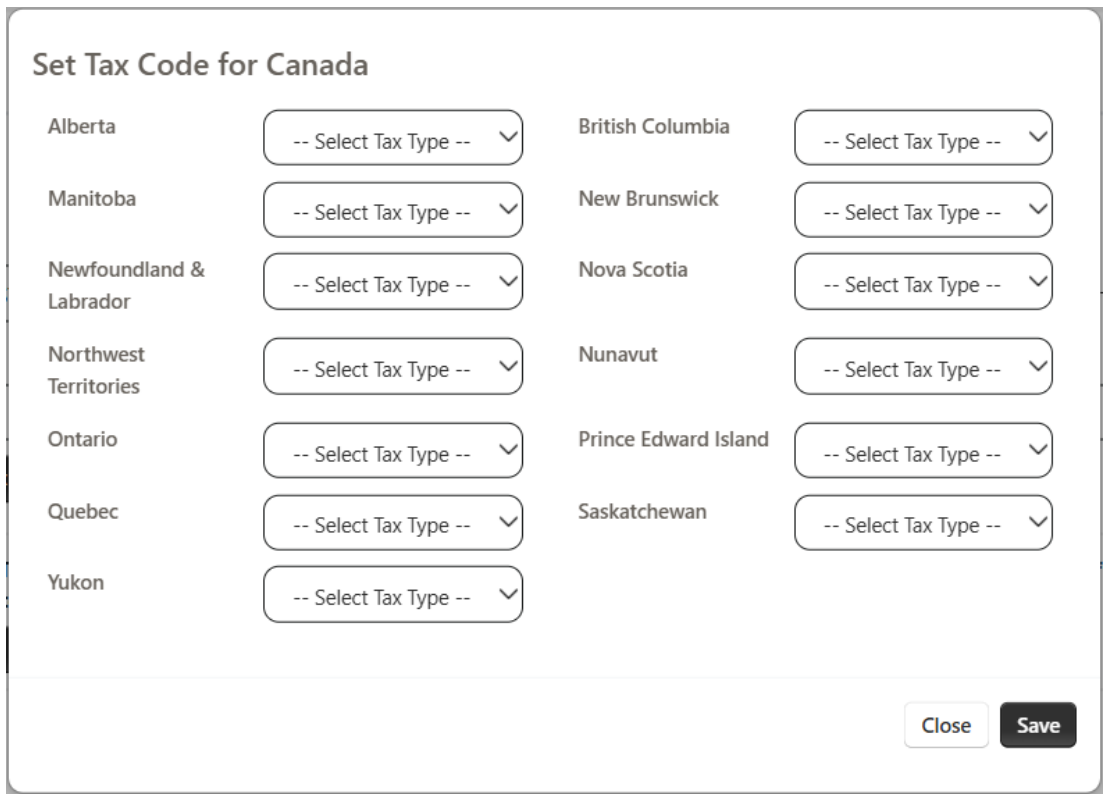
For other Provinces, please use the “Provincial Tax Rates for Canada” button to configure the rates for other states. If this is left empty for one or more states, the default rate in Point 1 will be applied to that order.